Wednesday, September 29, 2010

Kathy has made this beautiful card for my themed challenge this week


and I just thought I'd remind you that we have a tutorial on this blog showing you how to achieve this effect.

The tutorial is here if you'd like to recreate this beautiful effect.

Happy Crafting

Lauren x

Monday, September 27, 2010

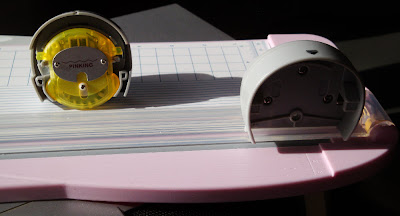
Review of the Woodware Trimmer with Fancy Blades by Kathy Kirby (Queen of all things PURPLE)


I bought my woodware trimmer set from Carole’s Crafts recently at £34.99. I have since seen them slightly cheaper but with a smaller range of blades so it depends whether you want the whole set!!! The set comes complete with one trimmer (12” cutting edge) and 12 blades. You can also buy the trimmer and just two blades (one obviously straight but not sure about the other) should you like the sound of it but not want all 12 blades.

The 12 blades (each in different coloured covers) are:

• Straight
• Perforating
• Scoring
• Postage Stamp
• Pinking
• Princess
• Victorian
• Rhythm
• Wave
• Deckle
• Twist
• Scallop

So, quite a selection of blades in the set then AND you can obtain replacement blades separately along with the grey cutting strip. There is even a storage container for the blades available, should you want it but I’m still using the plastic housing they came in!


The cutter has a side arm which folds out, to both measure and stabilise your project for cutting. There is a small plastic “release” catch at the bottom end of the cutter which allows the whole cutting edge to lift, in order to allow you to place your project which you then simply drop back in to place with an audible click and you are ready to cut. I did find that I needed to keep pressure on the blade housing to get a good cut though which I wasn’t used to with my Fiskars trimmer but then it only has a straight blade and I did so want some fancy alternatives!!! Changing the blade is a fairly simple process too, simply turn the raised (knob) on the back of the blade housing to centre top and pull the back off, it will bring the blade currently in use with it. Simply remove this blade and replace with your chosen blade before reversing the removal process. At this time there are no cutting areas exposed for you (or your littleys) to come to harm – which is a simply brilliant idea and superior to my Fiskars personal trimmer – which does have a rather small but wicked exposed cutting edge! It’s mildly fiddly to change blades but I suspect this is due more to the fact I’ve never had this option previously rather than to any complication in the procedure which, really, couldn’t be much simpler!


I have yet to try all the blades but I do like the pinking and the postage stamp blades and bookmarks, vouchers, removable tags will be a breeze with the perforating blade and my scoring should be straight as an arrow in future!

I would rate this product 9/10 and yes – with the benefit of hindsight - think I would buy it again!! PS It has nothing to do with the fact that the Victorian blade is purple!!!


Many thanks to Kathy for this useful review of the Woodware Trimmer. I will add that I have one as well and am delighted with it. Don't forget, if you would like to do a review, a tutorial, or an article for us; we'd be delighted to feature it here.

Sunday, September 26, 2010

Shaving foam backgrounds.

This is messy, very messy in fact but  I do think it's fun!  Try not to get caught stealing your hubby's /partner's shaving foam. Mine had gone out to watch the football and came back in just as I was taking my photographs and the evidence was clearly on the table especially as I have shaving gel for my legs!! He knew it was his!! Whoops! I am kind of forgiven, but sadly I think my shaving foam backgrounds are numbered and I am going to have to buy my own :(.
You will need: Something to cover your work surface with, especially if it is your best dining room table and some smooth or glossy cardstock. In addition you will also need some reinkers.  I tried distress inks, but it didn't work.  These inks are a very old set I have by Ranger called Posh impressions inkabilities.  I have no idea if they still manufacture these I am afraid! You will also need a knife or something to scrape the foam off with, a can of shaving foam not gel and old lid or plate and maybe some gloves if you don't like getting ink on your fingers! Gather all your things together and get ready to play!
Start by spraying a decent amount of foam on to your old lid or plate.
Spread to make an even surface.
Then drop some ink in small amounts across the surface.  Make this random as you are going to spread it around a bit.
I have chosen to use just two colours, but you could use as many as you want. It just depends what kind of effect you would like to achieve.

 Next take your knife or any thing else you have to hand and cut across the surface of the shaving foam. You can experiment a bit if you so wish! I wouldn't play around with it too much though as the colours will start to muddy and you won't get such a pretty effect.

When you are happy with your swirly pattern, place  your cardstock on top of this and take a print. You can repeat this several times if you wish.

Next peel it away from the foam and scrape the excess  foam off of the surface of your cardstock. Wipe the scraped off foam in some kitchen towel.
Leave to dry fully before using on your cards. Don't waste your shaving foam!  Use it to make lots of backgrounds so that you have a little supply to go on other projects. If you want to use different colours I scrape the surface of the foam and wipe this in kitchen towel before putting down more ink.




Saturday, September 25, 2010

New Autumn house mouse stamps from Joanna Sheen.

 Joanna Sheen has brought out a set of four autumn and four summer house mouse stamps. Now I do want them all you understand but I can't afford them all just yet.  I thought you might like to see the two sets that I treated myself to though and thought you might just like to know what I think of them. These are the two sets I bought this week. They are called 'Tumble' and 'Berry'. The tumble one features mice and leaves and the berry one has a cute little mouse breathing garlic fumes and some even cuter mice with berries.


I think you have to agree that they really are the cutest little mice going. If you were in any doubt about their cuteness, here is the birthday sets that I also bought recently.


The outside packaging, as you can see has the little mice all coloured up and they certainly do tempt you! When you open the packet, you will also see that the rubber has been quite deeply etched, so you know you are going to get a good print.

Once you stamp them, they are a dream to colour.

But the only bad thing about them is that you'll want the whole set! Do I recommend them? Oh yes, wholeheartedly!


Thursday, September 23, 2010

Take a look!

Do pop over to http://www.pinkpetticoat.blogspot.com/ this week. One of our dear friends, Katie, is on the design team for these fabulous digital downloads and there are some fab creations to look at this week.  Just be warned that the downloads are quite addictive and a couple might just sneak in your basket.

Thursday, September 16, 2010

Blog of the Week!

Hi everyone

We've had a suggestion from Kathy to have a 'Blog of the Week' and sent me some links to great blogs and websites. If anyone else has found something interesting, please let us know and we can add it here.

So here's this weeks 'Blog of the Week' and for all you Pennyblack lovers, this one is for you.....

xx

Wednesday, September 1, 2010

New Whiff of Joy Christmas Stamps and Metal Dies

I was so excited to see Whiff of Joy have released a new range of stamps for Christmas together with some metal dies to add that special something to your creations.


Check out the beautiful designs here at The Whiff of Joy Blog. You will find links for great tutorials and for the Whiff of Joy shop.