Roberta from Prarie Fairy has kindly given me permission to use her tutorial on Prisma Colour pencils. I thought it would be useful for those of us who are still learning with these pencils. Roberta reccommends Baby Oil instead of Sansador, it's cheaper too!
Be sure to pop over to Robertas blog HERE
COLORED PENCIL TUTORIAL
Here is a list of some supplies you will find useful for using wax based pencil crayons. From left to right is as follows:
solvent based blender pen
colorless pencil for burnishing
blending stumps
tourtillions (different type of stump)
erasers at top soft and firm
sharpeners at bottom
extender for holding small leftover pencils
Other supplies for blending you will want to consider are gamsol, odorless mineral spirits or baby oil. In the tutorial I use baby oil, my fave by far! Use the blending stumps with these to create soft watercolor like effects.
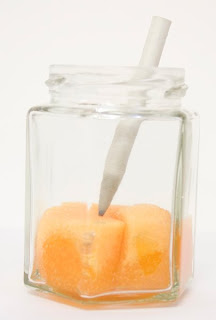
I put sponges in a jar with the baby oil and then just squish the blending stump into it.
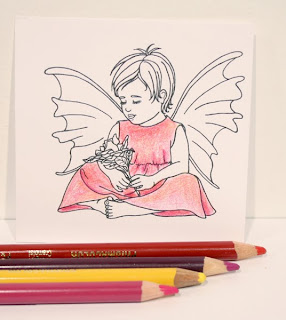
This is the fairy after I have put a soft layer of pink all over her dress. I then use some yellow in the warmer areas where there may me some light hitting the dress. I use red in the deeper colored areas. All applications are a soft layering application. In the darkest areas I use a purple to cool it off and deepen the shadows a little.
I then use the blending stump and baby oil to rub the penciled areas to “melt” the crayon and create a soft water colored effect. I decided after I had blended it to deepen the shadows further with a little more red and a darker purple. You can do this, keep layering and blending. I love being able to do that without damaging the paper. When you use a blending pen you can damage the surface of the paper though so take it easy.
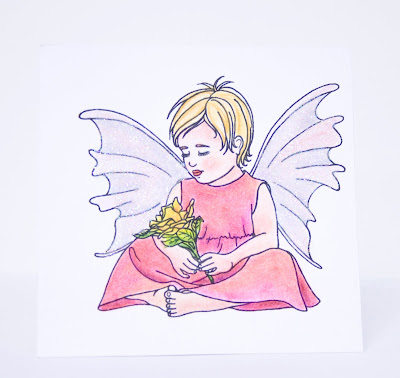
And here is the finished fairy. Even though I used the baby oil my glue pen still works for adding glitter to the wings. Have fun layering colors to create new ones. You are save combining colors as long as you use colors next to each other on the color wheel. Eg. Use purple to cool down a red because red & blue make purple so purple is next to red on the color wheel. So is orange so you use orange or yellow to warm up red.
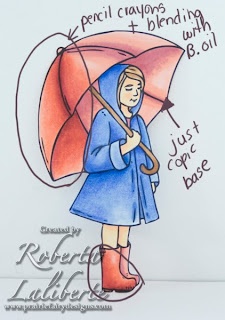
In this picture I have taken an image that I colored with copics. My colors are very limited with my copics so I added some pencil crayon shading over top and blended it with the stump and baby oil to smooth out the look and punch up the vibrance. I am sure you can tell in the picture the circled areas are where I added the colored pencil. I also did the same to her raincoat.
I hope this helps too, so if you have a little accident with blending your copics as they can be so fussy here is a little trick to fix it up.
Oh yeah, had a good question. I use ctmh daisy white cardstock. Stampin Up whisper white is fine too. There are expensive rough papers for colored pencil techniques but if you are looking for a nice smooth copic marker look you want smooth paper. The trick is to buy GOOD QUALITY white cardstock. Don’t cheap out here. You want it to be at LEAST 80lbs with good sizing. Sizing is something they coat the paper with to give it a nice smooth surface so that pigments don’t soak in to quickly. If your paper is cheap anything you put on it will soak right in and look uneven. Cheap paper feels rough and looks rough. Good paper is smooth with a nice sheen to it. Digital images print better on them and have smoother edges. On cheap paper the image looks rough or burred.
I hope you liked the tutorial and you decide to try having some fun with colored pencils. Baby oil even works well with Laurention colored pencils.
COLORED PENCIL AND BABY OIL TUTORIAL
This is my preferred method for coloring images. I also prefer baby oil to gamsol. Gamsol is alcohol based and can tear the paper if you over work the paper. The baby oil emulsifies the colored pencils and makes it possible for you to go back over time and time again to build rich layers. I have not had any trouble using gel pens over them either.
You will need good quality colored pencils, I like prismacolor premiers.
A small jar with sponges and baby oil in it just to soak the sponge so that your blending stups don’t get too much oil on them. (Excess oil can soak into the paper.)
Blending stumps that you can get at any art supply store.
Color a soft layer all over
blend in circular motion with stump and oil till you have a smooth finish!

Add more of same color to start to shade sides

Add little darker blue now and blend again

You could stop here. Light med and dark blue. Now watch.

I added purple to create depth. I blew out the brightness on the pencil so you could see the color I used

Add some reds and another layer of navy.

A little more navy and some blending. At this stage the surface is so smooth you don’t even need any more baby oil. you could pretty much just use the plain stump after the second layer.

xx


11 comments:
great tutorial and i love the idea of shading on top of copic pens. thanks for sharing roberta. X
Oh this is wonderful Karen! Thanks so much for adding my tutorial here. It looks wonderful!
xoxoxo
Great info - thanks for this tutorial
Kathyk
Excellent tutorial :)
This is really good and so easy to follow, would love to link you on my sidebar, so I can find you again!
(Lyn)
Hi Lyn,
That would be great, thanks!
xx
Super tutorial thanks for sharing,
going to link you to may sidebar too
Shaz in oz.x
Fantastic tutorial. Just purchased my first set of Prismacolor Premier Pencils and this seems a much easier way to use them than what I have read using the Gamsol.
Thanks for sharing.
awesome tutorial. thank you
So grateful! Great Tutorial!
One of the biggest reasons abstract art wallpapers have become so popular is their incredible versatility. They can match any personality, mood, or moment with ease.
Want a sleek, professional vibe? Go for a dark, minimalist abstract design.
Craving something uplifting? A bright, expressive color burst will do the trick.
Need a calming atmosphere? Soft gradients and fluid lines create instant tranquility.
Abstract art never limits you to a single theme. Instead, it adapts to your emotional and aesthetic preferences, making it a perfect choice for both personal use and professional settings.
https://colornjoy.com/blogs/halloween-wallpapers
https://colornjoy.com/blogs/hello-kitty-wallpapers
https://colornjoy.com/blogs/hello-kitty-wallpapers/lock-screen-hello-kitty-wallpaper-iphone-download-1qi7z82u2
https://colornjoy.com/blogs/basketball-wallpapers/nike-basketball-wallpaper-4k-hd-9sg9r45r4
Post a Comment