Friday, July 30, 2010

HOW TO MAKE: my fairytale castle


You will need:-

2 sheets of silver A4 card
1 sheet white card to stamp your images on
scraps of green card
felt flowers
Scissors
foam squares
double sided sticky tape or glue
scraps of ribbon
large heart template/Nestabilities Die or similar

1. Trim one piece of card to 12 cm widthways and set aside.

2. Score a line one cm in down the two longest sides of the full size piece of A4 card (the bit you haven't trimmed). Draw the top of the tower onto one of the short sides of the piece of scored card to create the top of the tower and cut out. Its very easy just draw a few different sized narrow rectangles as shown in the photograph to get the effect you want. At this point I inked around the edges of the card.


3. I stenciled my brick pattern onto my card, starting about 2inches down, and you can find the instructions here. When you have finished, stick your ribbon on where the plain bit of tower meets the brickwork (see photograph).


4. Now stamp your images onto your white card. I used a Tilda image and an Edwin image by Magnolia. They have a fairytale range which is perfect for this. Colour in your images and carefully cut them out.

5. Draw a large heart onto silver card and a slightly smaller heart onto white card using your templates and cut them out carefully. Ink the white card carefully to look like sky. A good way to do this is to take a clean blusher brush and dab it onto your ink before dabbing it onto your paper until you get the desired effect.


6. Now cut across the top of the heart (the mouse ears bit(!?) to create a window shape.

7. Cut out a small rectangular piece of silver card for a window sill and ink the edges.

8. Layer together to create the scene. I stuck the two window pieces together using double side tape and then layered Tilda and the window sill on with foam squares to create a bit of dimension. Now stick onto your tower roughly in the centre about an inch below your ribbon.


9. Now take your piece of green card and in the corner, draw a bush shape. You should have two square sides and one wiggly one. In another corner, draw a smaller one to layer on top of the first. They don't have to be identical. The whole point is that they don't (if you see what I mean)

10. Cut out your hedge and layer up with foam squares. Put your prince on top.


11. Now create your vine. Again with green card. I used a Sizzix die but you can easily draw it freehand. You want it to reach up to the window ideally. Cut out and place your flowers randomly over it. An odd number always looks best but hey, its your tower so its up to you.


12. Now you're pretty much done. Put double sided sticky tape or glue down the two previously scored sides of the A4 card and stick to the 12cm wide piece of card so that you get a curve.


You're done. At this point, however, you can stick your tower to a base and use it to keep tissues, cotton wool balls, pens and pencils or anything else you fancy inside.

Enjoy

Lauren x

Wednesday, July 28, 2010

10 Button-tastic Facts


Just for a bit of fun I thought you might enjoy these 10 button related nuggets...


1. The first buttons were actually used as more as ornaments or seals rather than fastenings

2. the earliest known button was found at Mohenjo-daro in the Indus Valley. It is made of a curved shell and is about 5000 years old

3. Buttons are measured in Lignes (pronounced Lines) and abbreviated L. 40 Lignes = 1 inch (approx)

4. During the World Wars, buttons were made containing miniature working compasses

5. The button and buttonhole arrived in Europe about 1200AD when the Crusaders brought the idea back from the Turks and Mongols.

6. In 1250 the French aristocracy passed laws restricting the use of decorative buttons so that only cloth covered buttons could be used by the peasantry.

7. In the 16th Century buttons were condemned as sinful by the Puritans

8. Louis XIV adored his buttons and his troops all wore silver coloured bone buttons on their tunics

9. The most popular button of the 19th Century, was the black glass button, which was mainly pearl-shaped. This was made for the masses in response to Queen Victoria’s usage of black jet buttons - mourning buttons - following the death of Prince Albert.

10. Even today in the USA the Amish community don't wear buttons as they consider them a sign of pride

Tuesday, July 27, 2010

Cute Gift Box Tutorial with Clare

Here is a tutorial for a cute little gift box. I have put in a cellophane bag full of chocolates but you could fit some homemade cookies or even some toiletries into it.


Step 1: Take an A4 sheet of card stock. Carefully draw on the following lines, 4cm line each side of long edge of card and 12cm from the short edges of card. (See photo)


Step 2: Score or emboss down each line. This will give you a much better fold line so is well worth the extra step.

Step 3: Cut up each of the lines to create flaps (See photo and cut lines marked here)


Step 4: Use a bone folder and fold in all flaps to create a nice neat finish.

Step 5: Punch the ends of the 2 largest flaps to create a pretty decorative edge.


Step 6: Fold in and stick flaps as shown in the photograph. For speed I used Stix2 micro dots but wet glue will create a strong box. Leave to dry.

Step 7: Decorate. I added eyelets to create a little fastening with a ribbon and some cute decoupage images but this is where you can let your imagination run wild!


Thanks Clare.

Please click HERE to be taken to Clares blog.

Mica Powder Tutorial by Kathy Kirby

Tools required:

Mica powders (perfect pearls, pearlex, cosmic shimmer, etc)
Soft brushes (1 fine and one broad) and one for brushing away excess
Versamark ink pad (pigment ink pads will work too and offer diferent colour combos – you just need to experiment till you find what works for you)
Stamp selection
Cheap hairspray
Gum Arabic (optional)


First recommendation: put down either a craft mat or paper because you will get powder on your worktable otherwise.

Technique One: Ink up your chosen stamp using the versamark ink. Take your white card (try it with dark card too – VERY striking) and stamp the image. If using clear ink you won’t see clearly where your stamp is unless you spot the wet image – don’t panic. Then, apply a little of your chosen mica powder to one of the brushes (depending on your chosen colour scheme and stamp you may find the narrow or broader one more suitable) and apply with the brush. I usually have the lids off three or four mica powders at one time to allow for variation. It’s not a very precise science just brush away and experiment – trust me, it’s a lot of fun! Once you are happy with the spread of powder take a clean brush and go over your design to remove the excess and reveal your lovely design. Spray with cheap hairspray to set your design and mount/embellish as preferred.


Technique Two: Mix your chosen mica colours with water on a palette (I usually use an old CD) and apply directly to your chosen stamp before stamping as normal (which gives a lovely watercolor effect – Penny Black Brushstroke stamps are PERFECT for this) or ....


Technique Three: colour in a previously stamped image using your mica powders mixed with water, ensuring that the ink used to stamp the image won’t run when in contact with water/gum arabic.

Technique Four and Five: use the same methods as Two and Three but mix gum arabic in with your mica powders instead as this will make your colours more vibrant.

Technique Six: you can use the mica powders in a mini mister with water, a little gum arabic and possibly a few drops of a liquid re-inker (which will make your colour stronger) and use them in conjunction with stencils (such as Tim Holtz) as these will be very similar to Glimmer Mist (but cheaper!!!!

You can also apply mica powders to projects to add a touch of glamour, such as art moulded pieces where you can apply the versamark ink with a brush or your fingers or kitchen roll and then brush the mica over – gives a fab lustre. I’ve applied it to projects where I’ve used melted wax – in this instance you won’t need the versamark ink as the beeswax, once cold but not fully set is still tacky enough to take the mica without the ink. You can use it pretty much anywhere you want to highlight – it’s a fun material to play with – trust me, give it a go . . . . you know you want to!


Mica powders are readily available in most craft shops (even Hobbycraft!) and, if your creative juices have been tempted then check out these links too
To Purchase:
http://www.craftyaddicts.co.uk/acatalog/Cosmic_Shimmer_Mica_Powders.html#a2912
http://www.thestampbug.co.uk/shop/dry-pigments-c-182.html
To find out more about using mica powders:
http://www.youtube.com/watch?v=rNR1OjZ26V8 features using mica with a water pen on silk
http://www.youtube.com/watch?v=fAE0BrdPAy8&feature=PlayList&p=8AE6A343ED5EE878&playnext_from=PL&playnext=1&index=2 features mica and scarp booking
http://www.youtube.com/watch?v=VTubS36YrTw&feature=related this features acetate

Thanks Kathy, please click HERE to be taken to Kathys blog.

Sunday, July 25, 2010

A history of the rubber stamp.

Next time you go to the dentist and he or she decides that you need some treatment, just sit back, relax and thank them for being instrumental in bringing you your favourite hobby of rubber stamping! Aah, now you're probably thinking that I have completely lost my marbles, but no, you'd be wrong there because the birth of the rubber stamp is very closely linked to early dentistry! Surprised? Yes, me too! So how did this all come about?


 A walk back in time sees the earliest stamps being made from metal, usually brass and these preceded the rubber version by possibly six to eight years.  They were originally used with wax and were important in sealing important documents for privacy.  We see this on many historical dramas don't we, when the messenger rides off in to the distance clutching that important piece of information which often results in the beheading of somebody or other!! Phew, thank goodness for the arrival for Royal Mail eh? I don't much fancy seeing a guy on horseback with one of those messages in his mitts!  I'd be running for the hills!

Anyway, I digress! There does appear to be a little confusion surrounding the production of the first rubber stamp, but it was in America that a chap by the name of Charles Goodyear decided to investigate in his kitchen with some rubber and sulphur. Eat your heart out Delia Smith, bet you've never cooked with rubber and sulphur! He dropped a mixture of these two ingredients on to his hot stove and found it to be still pliable the next day! Hurrah! This process was called vulcanisation after Vulcan, The Roman god of fire. Thus, in 1844 Charles Goodyear had discovered how to cure rubber.

Dentists were using vulcanised rubber, set in plaster moulds, to make cheap denture bases.  They had their own vulcanisers, called " dental pots" and these pots were eventually used to manufacture the first rubber stamps.

By 1866 James C. Woodruff had begun to experiment with a vulcaniser and was trying to make some letter moulds.  He had consulted with his dentist uncle and used the dental pot and so the first rubber stamp was born. Since then there has been an explosion of interest in rubber stamping that has seen it take on a life of its own.  So next time you pick up your stamps, say a little thanks to your dentist  and a set of false teeth!


( This history has been researched on the internet- any inaccuracies aren't mine!!)

Ribbon flowers with Rosie

I love playing around with pretty ribbons. Here's an idea for making some pretty little ribbon flowers.
You will need. Small card circles, a glue gun or similar strong glue, ribbon and patience! You can also add buttons for the centres of the roses or brads if you prefer.
First cut out your circles and place a blob of glue in the centre of the circle.
Then adhere your ribbon. Next gently begin to twist and stick the ribbon on to the card going around in a spiral. Build this up until you have made the desired size of your ribbon rose.


Once you've decided how big you want your flower to be finish off by sticking the final length of ribbon to the back of the card.
You can then decide how you would like to finish the centre, either with a brad or button, or make it layered as I have done here. A larger flower on the bottom and a smaller one on top.
Another simple way to make a ribbon flower is to simply take a length of ribbon and sew a running stitch along the length until when gently pulled the ribbon will gather into a circle. Tie the ends together and use either a brad or button to make the centre of the flower.


Saturday, July 24, 2010

Review of X-Cut Embossing Punch from Cherry

A review from CHERRY

The X-Cut embossing punch

I have to say I am a little disappointed with this too - purely because the embossing bit is a little hit and miss. See what you think

On Cardstock (DCWV)

On textured paper

On plain paper

The one side of the bow does not emboss well and the small decorations that run across the middle of the bauble also do not emboss well - in my opinion.

I think also because it is supposed to be using the card left rather than the punched out shape it is going to take me longer to use it as this is new to me - but experienced crafters may be more instantly creative than I can muster. Again for the £4-£5 I think it is a little expensive for what you get.

As you can tell I am under-whelmed by both products and give them both an 'ok' rating - I think there are probably better products out there that do these jobs. I prefer the embossing stencil as the outcome is of a better quality.


Review for Papermania Embossing Stencil from Cherry

A review from CHERRY

Here are my thoughts on the embossing punch from X-Cut and Papermania's Embossing stencil.

Papermania 'Summer Bloom' Steel Embossing Stencil

Firstly I have to say I thought the Papermania product was a die but it is NOT it is an embossing stencil - I must learn to read properly!

Anyway - once I had worked out the best way to use it in the Sizzix Big Shot - it comes with no instructions at all so be prepared to play with your machine and its set up. It does ok and gives a crisp image.

As you can see here. I have to say it does the job but I feel a bit stumped as to how to employ it creatively - but I was assured on the packaging that a little investigation on Papermania's website I may come up with something. However apart from finding the product there were no examples of it being used. I think for the £4 it is a little expensive for the use it is going to get by me. It is made of steel so I am wondering if the Dreamweavers Paste would work - any comments gratefully received about this.

Thanks Cherry, great review.


Digital Scrapbooking Review with Clare

Clare has very kindly given us a review on Digital Scrapbooking, looks interesting to me, hope you all like it too.


HERE'S a link to Clares blog so you can take a look at more of her work.


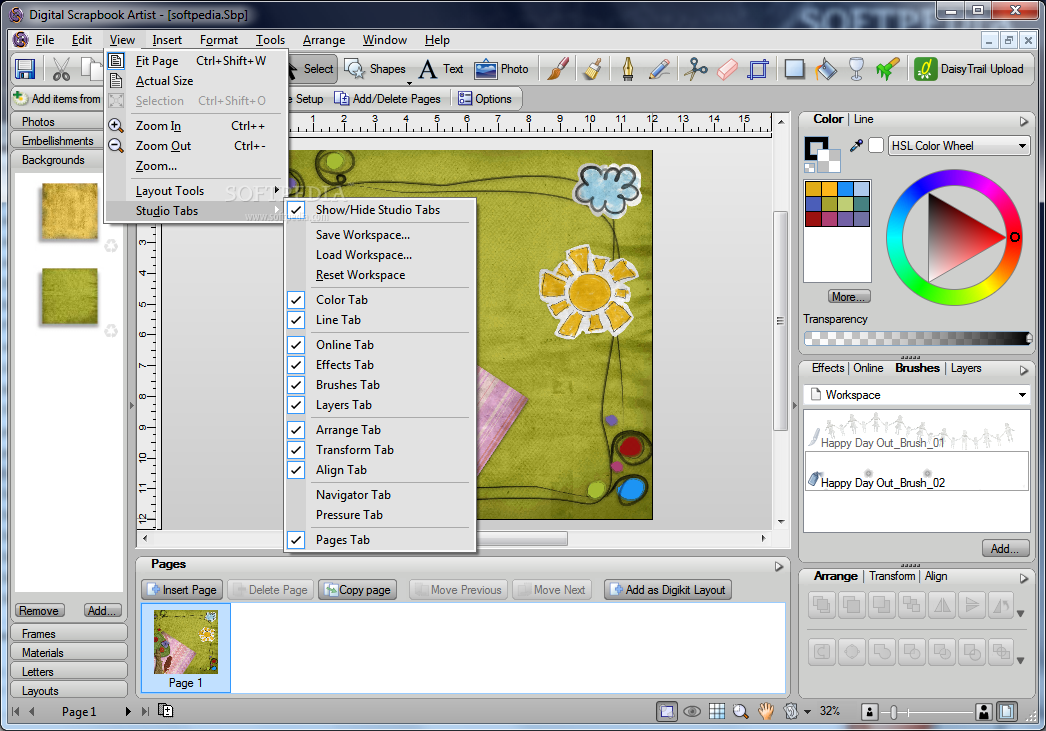
I have been scrapbooking special events and holidays for 4 years now but have always stuck to traditional techniques. I was going to add the name of the software to my birthday list but in the end couldn’t wait until September…….what a surprise NOT!!!! I bought my Serif Digital Scrapbook Artist 2 (DSA for short) on Create and Craft when it was the Pick of the Week.

Here is a review:

DSA is a fantastic piece of software which can be used not only for scrapbooking your special memories but you can also make you own cards too! If you are new to scrapbooking and don’t have much room for craft stash then this software is the perfect solution. There are digi kits which are photographic quality. They consist of backgrounds, frames, embellishments, materials, alphabets and some layouts. Just like rummaging through your craft stash you pick out what you want to use from your digi kit and what is great is that each kit is already coordinated which means a lot less messing about match colours, etc.


You can choose you page size 12 x 12, 8 x 8, A4 or set your own custom size. Then it is very much drag and drop. Start with your background. Add a photo frame and what is fabulous is that when you drag your photo into the frame it snaps in place. Next choose you embellishments (brads, buttons, bows, flowers, etc) and again it is all drag and drop. There are some lovely decorative alphabets which you can use for journaling. If you are a beginner or you need a layout in a hurry there are some pre-designed layouts which you can load and just drag/drop your photo into place.


I have to say that I have only been using this for 3 weeks now and I know there are so many things that I need to learn. There is also a very powerful photo editing feature but I haven’t even got that far yet.


My favourite feature is the paint brush tool. You can select the brush and then select an element to add to your page. These include stitching, ribbons, glitter, rose petals and frayed edges.


What is also great is that Serif have created a special forum called Daisy Trails and you can upload you work. There is a wonderful gallery of work and even better there are loads of video tutorials explaining how to do different things. This is very helpful and so you would never need to panic. If you need to know something there is quite a busy forum where you can post your questions too.


I have only just scratched the surface in this review and if you want to see more then here is a link to a video which describes many of the features. There are so many digi kits out there to buy and also loads of freebies too, that you wouldn’t need to worry about missing out on your craft stash shopping, it could still continue but in digital form!! They are quite affordable too.


I have to say if you already scrapbook you will love this software and I want to try hybrid scrapping now which combines digital and traditional scrapbooking. WATCH THIS SPACE!


I would definitely give it 10/10 and recommend it to anyone for wants to give scrapbooking a go. If you have never done scrapbooking before it would be a great place to start and if you are into your digital photography it is a must.


It costs about £30.00. You don’t need to be a computer geek either! I should also say if you want to dabble first there is a free compact version which you can download but it doesn't have all the feature of DSA2.


I MUST ATTACH A HEALTH WARNING TO THE SOFTWARE…………IT HAS VERY ADDICTIVE PROPERTIES AND YOU WILL JUST WANT TO KEEP PLAYING/CREATING!!


SO DEFINATELY IDEAL FOR US CRAFT MAD FOLKS!!!!!!!!!!


Thank you Clare.