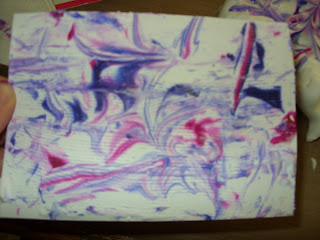
You will need: Something to cover your work surface with, especially if it is your best dining room table and some smooth or glossy cardstock. In addition you will also need some reinkers. I tried distress inks, but it didn't work. These inks are a very old set I have by Ranger called Posh impressions inkabilities. I have no idea if they still manufacture these I am afraid! You will also need a knife or something to scrape the foam off with, a can of shaving foam not gel and old lid or plate and maybe some gloves if you don't like getting ink on your fingers! Gather all your things together and get ready to play!
Start by spraying a decent amount of foam on to your old lid or plate.
Spread to make an even surface.
Then drop some ink in small amounts across the surface. Make this random as you are going to spread it around a bit.
I have chosen to use just two colours, but you could use as many as you want. It just depends what kind of effect you would like to achieve.
Next take your knife or any thing else you have to hand and cut across the surface of the shaving foam. You can experiment a bit if you so wish! I wouldn't play around with it too much though as the colours will start to muddy and you won't get such a pretty effect.
When you are happy with your swirly pattern, place your cardstock on top of this and take a print. You can repeat this several times if you wish.
Next peel it away from the foam and scrape the excess foam off of the surface of your cardstock. Wipe the scraped off foam in some kitchen towel.
Leave to dry fully before using on your cards. Don't waste your shaving foam! Use it to make lots of backgrounds so that you have a little supply to go on other projects. If you want to use different colours I scrape the surface of the foam and wipe this in kitchen towel before putting down more ink.


12 comments:
looks fab, i don't let oh shave his stubble off tho as he looks cute with it! x
I insist mine shaves it off!! Stubble rash on me is not a pretty sight!!!! Lol!
Thanks for the reminder of this technique Rosie, such great results :o) I hope Mr Rosie has forgiven you by now !!! LOL
hugs
wynneth
x
Brilliant post - I so wanted a tutorial on this after reading about it on My Partner in Crafting Crime blog. Thank you so much for this info - will give it a try some time. Jx
WOW! This is great Rosie. I've never ever seen this technique before. Looks like loads of fun and the effect is brilliant. Thanks for sharing. Lx
WOW! This is great Rosie. I've never ever seen this technique before. Looks like loads of fun and the effect is brilliant. Thanks for sharing. Lx
Saldy Rosie, I can answer that question . . . NO, Dee Gruenig's inkabilities have been discontinued by Ranger. I have two sets and Lauren and Wynneth thoroughly enjoyed playing with them at the Bristol craftathon so I researched the possibility of obtaining them . . shame as the original technique (with a sponge) is pretty cool too isn't it?
Lovely backgrounds you've created too Rosie - might have to try that myself . . .
Kathyk
Oh, that's such a shame! I only have the one set and I have had them for years. They were one of the first crafting things I bought years ago. I'm going to sulk now :(
I've had mine for so long that in trying to unblock the nozzle of one of the bottles I "killed" my pokey tool - didn't I Wynneth and Lauren!?!??!? They were such a fab product - I've not tried e-bay for them though.....
Kathyk
Found some on e-bay in euros and dollars for anyone interested.
Kathyk
Ooh now that sure is crafty!
Great Rosie x
Great fun that looks too! i have seen it done with Mica spritz as well. what a good excuse to get messy! x
Post a Comment