Thursday, December 16, 2010

Gift Bag Tutorial by Karen

I saw a gift bag similar to this being made on Create & Craft and thought I'd have a go at making my own. I couldn't remember the instructions, so just went for it. I made this just big enough to hold a box of Maltesers and an envelope with some money inside. For the top I used the xxl Go Kreate dies on my new toy, the Grand Caliber from Spellbinders.

Cut a peice of card to 81/4 x 10 inches and score at 4 & 6 inches across the width of the card and score down each side at 1.2 inches.
Cut along the 4 and 6 inch scores up to the 1.2in mark.Fold along all the score lines.
Fold in the sides, which will overlap just a little bit.
Glue the side together, I used a very narrow double sided tape.
Now for the top.
Cut a peice of card measuring 61/2 x 91/2. and score at 31/2 and 71/2 If you're using grand nesties or Go Kreate xxl dies for this you'll need to adjust the size accordingly.
Fold along your score lines, and check it fits your base..... lol. Now is the time to decorate your bag.
Place some double sided tape on the inside of one half, this will be the back of your bag.
Attach the top to the base on one side.Use a small piece of velcro for the fastening.
Add a piece of ribbon, sorry I forgot the pic, to the top. I cut a small slit about an inch in from either edge, and slipped my ribbon through them and used a small amount of silcone to attach the ends of the ribbon to the inside of the lid.
Friday, October 22, 2010

Post-it Note Tutorial by Kathy Kirby

I cannot claim this method as my own as it originally appeared in a fairly recent issue of Craft Stamper (October Issue - Designer Joanne Wardle) but this is how I do it . . . .


Tools needed:
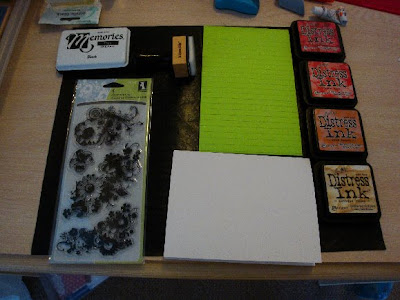
• Distress Inks in co-coordinating colours (I used Antique Linen, Wild Honey, Barn Door and Fired Brick)
• Tim Holtz Distressing Tool with foam pad (though cut and dry works just as well.
• Plain, smooth, white card
• Post-Its or Sticky notes – I used C5 size simply because that was the most cost effective option here!
• A suitable silhouette stamp
• Black Ink (like memento or Versafine)

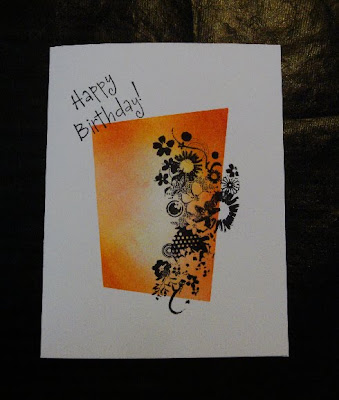
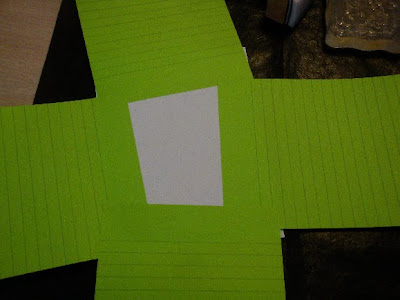
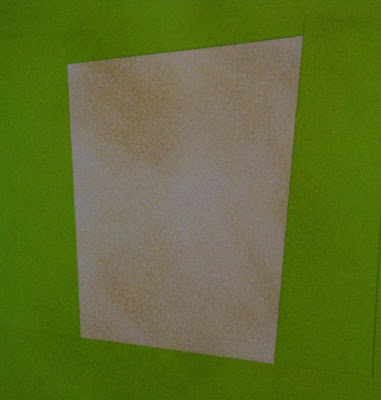
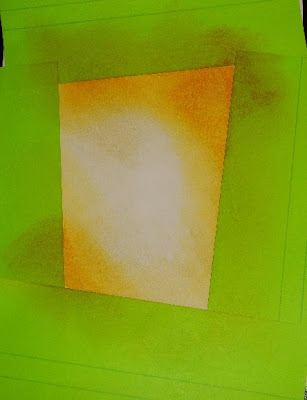
Once you have chosen your stamp you can then use your post its to mask off an area on your card, in a shape you like and very slightly smaller (or narrower) than your chosen stamp, depending on which way you wish to stamp your image. I chose a non symmetrical rectangle for my morphic flower stamp. I tried masking and colouring before choosing my stamp but choosing the stamp first works best as you can then mask to suit.


Taking your distressing tool (with pad attached) or your cut and dry and starting with the lightest colour, using smooth circular movements cover the masked area with a light shading of the colour, in my case it was the Antique Linen.


Then taking a different pad (you CAN use the same pad as I did, if you don’t have many) apply the next colour (Wild Honey) to a slightly smaller area, I applied mine all round the edges, but you could apply to just the top/bottom/one side/two sides – to suit you really.


Next colour/s were (Barn Door and Fired Brick) which I applied to the corners only but variations could be opposing corners or working in from the sides – again, your choice.


Once you are happy with the colour then remove the post-its to reveal your fab panel. Ink up your silhouette stamp and position to suit you, usually most effective if some of the stamp appears outside of your coloured panel. As you can see from my finished card photo I also added an occasion sentiment to mine.


It really is THAT SIMPLE!!!, but isn’t it great? I love the combination of Mustard Seed, Spiced Marmalade and Fired Brick but Spun Sugar, Victorian Velvet and Fired Brick is great too – give it a whirl and you too might find yourself hook – I’m pretty sure Wynneth fell for the technique too whilst here in sunny Florida!!! Another variation I tried was (after ensuring that the distress inks are completely DRY) over stamping with a glue pad and then sprinkling crystal glitter to makeyour project really twinkly – another fab possibility you really MUST try. The stamp IS important and strong silhouettes work just great with this technique so break out the one’s you’ve been looking at and wondering what to do with! ENJOY.

Monday, October 11, 2010

Notelet Gift Set Tutorial by Clare - Miscanthuscrafts

Here is a tutorial for a notelet gift set. I have made a handful of notelets to go into the box but you could fit 10 C6 (6” x 4”) cards and envelopes easily.

Step 1: Take a 12” x 12” sheet of card stock. Carefully draw/score on the following lines, 3 ½” from one edge and 4” from the other then trim off an inch at the top of the cardstock. (See photo)


Step 2: Then measure and score a 2” line across the top and bottom of the card.


Step 3: Cut away the shade areas. (See photo)


Step 4: Now measure/score ¾” inch around the centre panel of the card


Step 5: Use a bone folder and fold in all flaps to create a nice neat finish.


Step 6: Before you glue the flaps together to create your notelet holder, turn over and decorate the front of the box.


Step 7: Turn over to reverse and glue flaps to create your holder. Once the glue is dry punch top corners to create a decorative flap and line inside of holder with co-ordinating paper to add lovely finishing touch.


Step 8: Use magnetic fasteners or stick/sew Velcro to fasten shut the notelet holder


Step 9: Add your co-ordinating notelets and envelopes. For an extra finishing touch add a lovely ribbon and tie into a bow.

Wednesday, September 29, 2010

Kathy has made this beautiful card for my themed challenge this week


and I just thought I'd remind you that we have a tutorial on this blog showing you how to achieve this effect.

The tutorial is here if you'd like to recreate this beautiful effect.

Happy Crafting

Lauren x

Monday, September 27, 2010

Review of the Woodware Trimmer with Fancy Blades by Kathy Kirby (Queen of all things PURPLE)


I bought my woodware trimmer set from Carole’s Crafts recently at £34.99. I have since seen them slightly cheaper but with a smaller range of blades so it depends whether you want the whole set!!! The set comes complete with one trimmer (12” cutting edge) and 12 blades. You can also buy the trimmer and just two blades (one obviously straight but not sure about the other) should you like the sound of it but not want all 12 blades.

The 12 blades (each in different coloured covers) are:

• Straight
• Perforating
• Scoring
• Postage Stamp
• Pinking
• Princess
• Victorian
• Rhythm
• Wave
• Deckle
• Twist
• Scallop

So, quite a selection of blades in the set then AND you can obtain replacement blades separately along with the grey cutting strip. There is even a storage container for the blades available, should you want it but I’m still using the plastic housing they came in!


The cutter has a side arm which folds out, to both measure and stabilise your project for cutting. There is a small plastic “release” catch at the bottom end of the cutter which allows the whole cutting edge to lift, in order to allow you to place your project which you then simply drop back in to place with an audible click and you are ready to cut. I did find that I needed to keep pressure on the blade housing to get a good cut though which I wasn’t used to with my Fiskars trimmer but then it only has a straight blade and I did so want some fancy alternatives!!! Changing the blade is a fairly simple process too, simply turn the raised (knob) on the back of the blade housing to centre top and pull the back off, it will bring the blade currently in use with it. Simply remove this blade and replace with your chosen blade before reversing the removal process. At this time there are no cutting areas exposed for you (or your littleys) to come to harm – which is a simply brilliant idea and superior to my Fiskars personal trimmer – which does have a rather small but wicked exposed cutting edge! It’s mildly fiddly to change blades but I suspect this is due more to the fact I’ve never had this option previously rather than to any complication in the procedure which, really, couldn’t be much simpler!


I have yet to try all the blades but I do like the pinking and the postage stamp blades and bookmarks, vouchers, removable tags will be a breeze with the perforating blade and my scoring should be straight as an arrow in future!

I would rate this product 9/10 and yes – with the benefit of hindsight - think I would buy it again!! PS It has nothing to do with the fact that the Victorian blade is purple!!!


Many thanks to Kathy for this useful review of the Woodware Trimmer. I will add that I have one as well and am delighted with it. Don't forget, if you would like to do a review, a tutorial, or an article for us; we'd be delighted to feature it here.

Sunday, September 26, 2010

Shaving foam backgrounds.

This is messy, very messy in fact but  I do think it's fun!  Try not to get caught stealing your hubby's /partner's shaving foam. Mine had gone out to watch the football and came back in just as I was taking my photographs and the evidence was clearly on the table especially as I have shaving gel for my legs!! He knew it was his!! Whoops! I am kind of forgiven, but sadly I think my shaving foam backgrounds are numbered and I am going to have to buy my own :(.
You will need: Something to cover your work surface with, especially if it is your best dining room table and some smooth or glossy cardstock. In addition you will also need some reinkers.  I tried distress inks, but it didn't work.  These inks are a very old set I have by Ranger called Posh impressions inkabilities.  I have no idea if they still manufacture these I am afraid! You will also need a knife or something to scrape the foam off with, a can of shaving foam not gel and old lid or plate and maybe some gloves if you don't like getting ink on your fingers! Gather all your things together and get ready to play!
Start by spraying a decent amount of foam on to your old lid or plate.
Spread to make an even surface.
Then drop some ink in small amounts across the surface.  Make this random as you are going to spread it around a bit.
I have chosen to use just two colours, but you could use as many as you want. It just depends what kind of effect you would like to achieve.

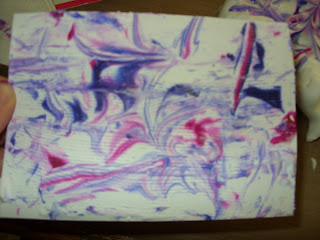
 Next take your knife or any thing else you have to hand and cut across the surface of the shaving foam. You can experiment a bit if you so wish! I wouldn't play around with it too much though as the colours will start to muddy and you won't get such a pretty effect.

When you are happy with your swirly pattern, place  your cardstock on top of this and take a print. You can repeat this several times if you wish.

Next peel it away from the foam and scrape the excess  foam off of the surface of your cardstock. Wipe the scraped off foam in some kitchen towel.
Leave to dry fully before using on your cards. Don't waste your shaving foam!  Use it to make lots of backgrounds so that you have a little supply to go on other projects. If you want to use different colours I scrape the surface of the foam and wipe this in kitchen towel before putting down more ink.


Saturday, September 25, 2010

New Autumn house mouse stamps from Joanna Sheen.

 Joanna Sheen has brought out a set of four autumn and four summer house mouse stamps. Now I do want them all you understand but I can't afford them all just yet.  I thought you might like to see the two sets that I treated myself to though and thought you might just like to know what I think of them. These are the two sets I bought this week. They are called 'Tumble' and 'Berry'. The tumble one features mice and leaves and the berry one has a cute little mouse breathing garlic fumes and some even cuter mice with berries.


I think you have to agree that they really are the cutest little mice going. If you were in any doubt about their cuteness, here is the birthday sets that I also bought recently.


The outside packaging, as you can see has the little mice all coloured up and they certainly do tempt you! When you open the packet, you will also see that the rubber has been quite deeply etched, so you know you are going to get a good print.

Once you stamp them, they are a dream to colour.

But the only bad thing about them is that you'll want the whole set! Do I recommend them? Oh yes, wholeheartedly!


Thursday, September 23, 2010

Take a look!

Do pop over to http://www.pinkpetticoat.blogspot.com/ this week. One of our dear friends, Katie, is on the design team for these fabulous digital downloads and there are some fab creations to look at this week.  Just be warned that the downloads are quite addictive and a couple might just sneak in your basket.

Thursday, September 16, 2010

Blog of the Week!

Hi everyone

We've had a suggestion from Kathy to have a 'Blog of the Week' and sent me some links to great blogs and websites. If anyone else has found something interesting, please let us know and we can add it here.

So here's this weeks 'Blog of the Week' and for all you Pennyblack lovers, this one is for you.....

xx

Wednesday, September 1, 2010

New Whiff of Joy Christmas Stamps and Metal Dies

I was so excited to see Whiff of Joy have released a new range of stamps for Christmas together with some metal dies to add that special something to your creations.


Check out the beautiful designs here at The Whiff of Joy Blog. You will find links for great tutorials and for the Whiff of Joy shop.